Archive for the ‘System Administration’ Category

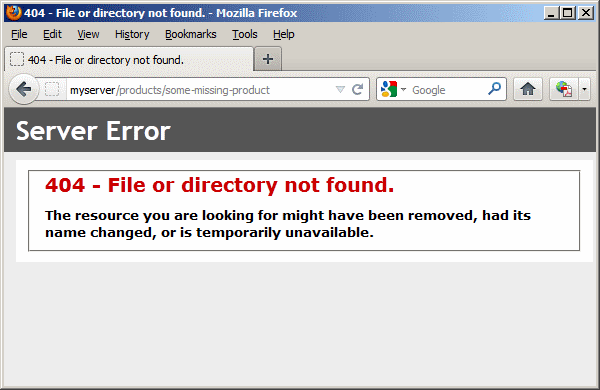
When I migrated our Mura site to our new IIS7 servers, one problem I noticed is that the Mura 404 handler was no longer showing. Instead the default IIS 404 page was displaying.

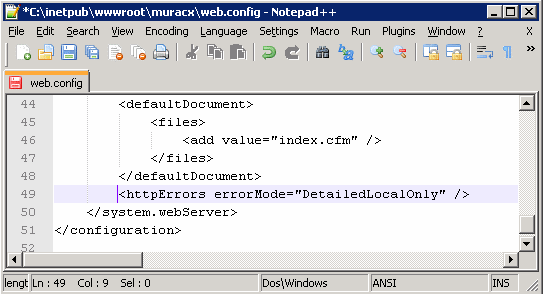
This problem doesn’t only apply to Mura, it will crop up with framework or code that uses the onMissingTemplate handler. The fix is easy. Edit the web.config file in the webroot, look for an httpErrors tag. It might look like this:

You need to add existingResponse="PassThrough" to it. If that element is missing completely, just add it with the necessary attribute.

Fixed!

I have been involved in setting up a new Mura site on Windows 2008 Server. Mura is a full featured CMS written in ColdFusion.

By default Mura URLs look something like /index.cfm/SiteID/pagename. So for example the contact us page might look like /index.cfm/default/contact-us. Not a great URL. But its fairly simple to translate into /contact-us which is much nicer.

Getting rid of the SiteID

Getting rid of the siteID is easy in the newest version of Mura. In the config/settings.ini.cfm file there is a setting named “siteidinurls”. Set this to 0 and Mura will no longer add the siteID to the URLs it generates. Of course this only works if you plan on only using Mura for one site. If you had more than one site, Mura wouldn’t know which one you are trying to access. There are several ways to get around this if you have more than one site, but I won’t get into that in this article.

Getting rid of the index.cfm

Getting rid of the index.cfm takes a little more work. There is another setting in the ini file called indexfileinurls. Setting this to 0 will remove the index.cfm from the URLs Mura generates. But when you click on any of those links you are going to get the 404 page. To fix this, you’ll need to tweak your webserver.

Apache is pretty straight forward, as you would expect. Enable the mod_rewrite module and drop this into an .htaccess file in your webroot:

RewriteEngine On
RewriteCond %{DOCUMENT_ROOT}%{REQUEST_URI} !-d
RewriteRule ^([a-zA-Z0-9/-]+)$ /index.cfm%{REQUEST_URI} [PT]

Our site happens to be hosted on Windows 2008 Server / IIS7. To do the rewriting on II7 you’ll need to install Microsoft’s URL rewriting extension. You can get it from here: http://www.iis.net/download/URLRewrite

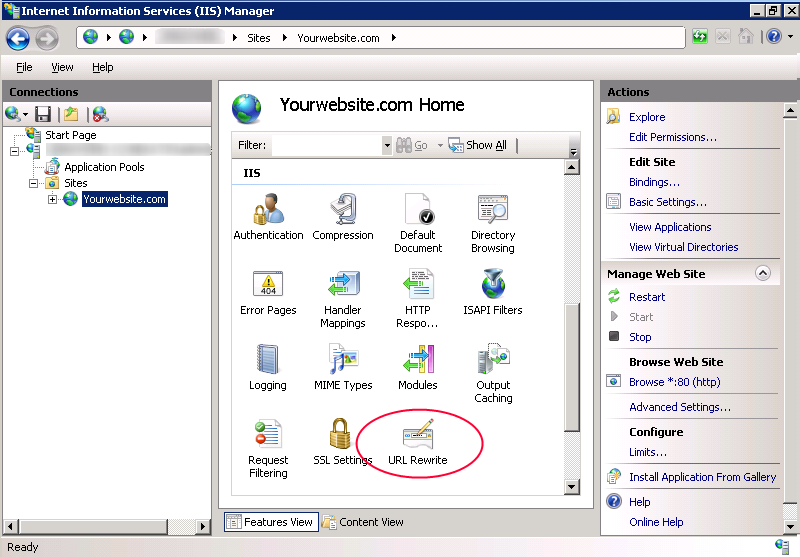
Once its installed, open IIS Manager. Click on your website, then double click on the new URL rewrite icon.

Continue reading ‘Mura URL rewriting on Windows 2008 / IIS7’ »

I had an issue recently when I was working with a couple other developers on a project. We keep our MySQL database in sync by exporting the database as an SQL script and sharing it in a subversion repository (I wish MS SQL could be this easy!). Our table names are saved with mix case, like “userFiles”, but everytime I would export my database the tables would come out all lower case, like “userfiles”.

Turns out this is a simple thing to fix, I had to add a line to MySQL’s config file: my.cnf. Mine was located at [MySQL installed root]\bin\my.cnf. The setting that needs to change is lower_case_table_names, I set the value to 2, like this:

lower_case_table_names=2

If you are interested, here are the different possible values:

Value Meaning
0 Table and database names are stored on disk using the lettercase
specified in the CREATE TABLE or CREATE DATABASE statement. Name comparisons are case
sensitive. Note that if you force this variable to 0 with –lower-case-table-names=0
on a case-insensitive file system and access MyISAM tablenames using different
lettercases, index corruption may result.
1 Table names are stored in lowercase on disk and name comparisons are not
case sensitive. MySQL converts all table names to
lowercase on storage and lookup. This behavior also
applies to database names and table aliases.
2 Table and database names are stored on disk using the lettercase
specified in the CREATE TABLE or CREATE DATABASE statement, but MySQL converts them to
lowercase on lookup. Name comparisons are not case sensitive. This works only on file
systems that are not case sensitive! InnoDB table names are stored in
lowercase, as for lower_case_table_names=1.

On Windows the default is 1.

More information at http://dev.mysql.com/doc/refman/5.0/en/identifier-case-sensitivity.html

We had an issue recently where one of our Excel import routines was putting garbled data into the database. By “garbled” I mean the field contained a few normal words then broke into a bunch of strange characters. This Excel file was read in using an ODBC datasource.

If you are not familiar with this method of reading Excel files, here is a short summary.
1) Create a system ODBC DSN using the MS Excel driver in your Windows ODBC control panel. Point it to an empty .xls file somewhere on your drive.
2) Create a datasource in ColdFusion (driver: “ODBC Socket”) and select your Windows ODBC DSN from the drop down.
3) Copy the XLS file you want to read on top of the empty file you setup in your ODBC DSN.
4) Use it like this in your CFML:

<cfquery name="myQuery" datasource="XLSPassThroughDSN">
SELECT * 
FROM [Sheet1$]
</cfquery>

This usually works well but for some reason we were having problems. Digging through the Excel file turned up nothing out of the ordinary, except some rows (and not the ones causing problems) looked like they were double byte encoded (unicode).

Turns out this XLS driver determines the data type of each column in the spread sheet by looking through the first couple of rows and guessing a data type based on that data. In our case column B only contained values with less than 100 characters in the first few dozen rows. So the driver assumed it was a varchar type of some length. But much further down in the spread sheet, in a different row, that same column contained a value that was several hundred characters, thus overflowing the data type.

Normally this only results in truncated data. If that would have been the issue I probably would have found the fix much sooner. But instead we were ending up with garbled data, which was truncated as well but it was impossible to tell.

The fix is to adjust your registry to tell the driver to scan through more, preferably all, of the rows before guessing at a data type. In your odbc control panel you’ll notice a setting for this:
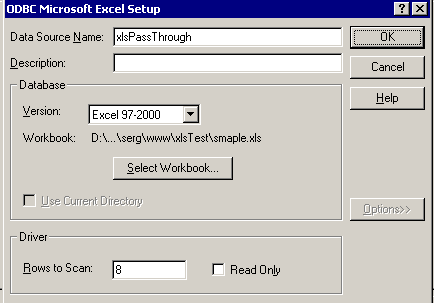
ODBC DSN screen shot

But, that doesn’t work! You need to change the registry value manually. I set mine to 1000, since that will cover the length of any of the spreadsheets we upload.

The registry keys are located at:

For Excel 97:
HKEY_LOCAL_MACHINE\SOFTWARE\Microsoft\Jet\3.5\Engines\Excel
For Excel 2000 and later versions:
HKEY_LOCAL_MACHINE\SOFTWARE\Microsoft\Jet\4.0\Engines\Excel

Here is the MS knowledge base article for more detail: http://support.microsoft.com/kb/189897/

Now the driver scans through all the rows before determining a data type, and probably uses something like a “text” type for column B. I think our data may have been getting garbled, instead of just truncated, because of the double byte data.
After installing Open Blue Dragon on Tomcat and hooking it up to Apache, I did some poking around and found I was able to pull up my bluedragon.xml configuration file directly in my browser. Now, this may not happen in all configurations (there are many ways to setup a J2EE web application), but it my case, running through Apache and having copied Blue Dragon’s WEB-INF directory to my webroot, I was able to browse this file. In case you didn’t know, all OpenBD’s settings are stored in a single xml file (which I find very convenient, by the way).

It didn’t work when going directly through Tomcat, i.e. browsing on port 8080 would not pull it up, I think Tomcat is smart enough to know not to serve files from the WEB-INF directory. But browsing through Apache on port 80 bypasses Tomcat for anything thats not a .cfm or .cfc file, so it would happily return the xml file. Datasource passwords are stored encrypted but the administrator password is clear text. Its easy to lock this down, just add this to your Apache config file:

<location "/WEB-INF/">
deny from all
</location>

When trying to create a Verity collection on a freshly setup ColdFusion8 installation today I received this error:

Unable to create collection MyCollection.
An error occurred while creating the collection: com.verity.api.administration.ConfigurationException: Failed to retrieve style path. (-6044)

Turns out the Verity installation did not complete correctly. I could tell by looking in the {cf-root}/verity/verity-install.log file. This problem is fixed by simply uninstalling and reinstalling verity.

In the {cf-root}/verity directory you’ll find a script named uninstall-verity.sh (on linux) or uninstall-verity.bat (on windows). Just run that and then run the install-verity.* file and you should be back in business.

I was installing ColdFusion 7.02 on a client’s CentOS 5.2 Linux server the other day and received an error when running the installer. Note that this OS is NOT supported by Adobe for this version of ColdFusion. This is a fairly old version of CF being installed on a pretty current version of CentOS. The error was:

[root@server tmp]# ./coldfusion-702-linux.bin
Preparing to install...
Extracting the JRE from the installer archive...
Unpacking the JRE...
Extracting the installation resources from the installer archive...
Configuring the installer for this system's environment...
awk: error while loading shared libraries: libdl.so.2: cannot open shared object file: No such file or directory
dirname: error while loading shared libraries: libc.so.6: cannot open shared object file: No such file or directory
/bin/ls: error while loading shared libraries: librt.so.1: cannot open shared object file: No such file or directory
basename: error while loading shared libraries: libc.so.6: cannot open shared object file: No such file or directory
dirname: error while loading shared libraries: libc.so.6: cannot open shared object file: No such file or directory
basename: error while loading shared libraries: libc.so.6: cannot open shared object file: No such file or directory
Launching installer
grep: error while loading shared libraries: libc.so.6: cannot open shared object file: No such file or directory
/tmp/install.dir.3348/Linux/resource/jre/bin/java: error while loading shared libraries: libpthread.so.0: cannot open shared object file: No such file or directory

There is a hard coded value in the installer thats causing things to get messed up. Fixing this is fairly easy, you can modify the installer like this:

cp coldfusion-702-linux.bin coldfusion-702-linux.bin.backup
cat coldfusion-702-linux.bin.backup | sed "s/export LD_ASSUME/#xport LD_ASSUME/" > coldfusion-702-linux.bin

That comments out the offending line in all places in the installation script.

More discussion on this here:
http://www.billmitchell.org/coldfusion/centos5/mx7_apache.php
http://www.talkingtree.com/blog/index.cfm/2006/12/6/Running-ColdFusion-MX-7-on-Fedora-Core-6-Linux

You will probably run into more issues installing CF7 on this version of CentOS but it can be done. I also had to upgrade the connector to work with Apache 2.2 (when CF7 came out the connector was designed to run on Apache 2.0). The Adobe KB article that discusses this is here: http://kb.adobe.com/selfservice/viewContent.do?externalId=8001e97&sliceId=1. Their example didn’t quite work for me because its defaulting to the version of Java thats on your OS, which won’t work unless its a Sun 1.4.2x version. So I just used the JRE that is bundled with ColdFusion to install the new connector:

/opt/coldfusionmx7/runtime/jre/bin/java -Dtrace.ci=1 -jar ../../runtime/lib/wsconfig.jar \
        -server coldfusion \
    -ws apache \
        -dir /etc/httpd/conf \
        -bin /usr/sbin/httpd \
        -script /etc/rc.d/init.d/httpd \
        -coldfusion -v

I thought that was the last hurdle but when we tried to log in to the ColdFusion administrator we got an error about “The Graphing service is not available”. The message in the log file was “Unable to initialize Graphing service: java.lang.UnsatisfiedLinkError: /opt/coldfusionmx7/runtime/jre/lib/i386/libawt.so: libXp.so.6: cannot open shared object file: No such file or directory”. This was fixed by installing the libXp library:

yum install libXp

I’m setting up mysql locally on my laptop this weekend, and ran into a snag that cost me at least an hour. To mimic a web app I am running locally, I needed to connect to mysql with a specific username and password. But no matter what I did, I always got this error:

MySQL: access denied for user: username (Using password: YES)

I got this when connecting via the command line client and via ColdFusion. Finally after some googling I came across this blog post suggesting to change the privilege details to allow connecting from ‘localhost’ instead of ‘%’. The % indicates a wildcard and should allow connections from any host. But for some reason this was not working for me. Changing it to ‘localhost’ fixed the problem and allowed me to connect. I think it may have had something to do with the fact that I checked a box when installing that would only allow connections from the localhost.

I used this SQL to fix the host setting after connecting to the ‘mysql’ database:

update user set Host=’localhost’ where User=’myUserName’

Sometimes its necessary to delete all the .svn folders from your subversion working copy.

Here is a simple way to do it on Linux:

rm -rf `find . -name .svn`

That might not work if you have hundreds or thousands of folders, as it might be too many arguments for the rm command. I still like it because its simple. But a more robust way would be:

find . -name .svn -prune -exec rm -rf {} \;

This calls rm on each file separately.

I haven’t tried the following, but on Windows you may be able to:

Create a cleanSVN.cmd file in the root containing these lines:

for /f “tokens=* delims=” %%i in (’dir /s /b /a:d *svn’) do (
rd /s /q “%%i”
)

You could also try browsing to the files in Windows Exporer and then:
Right click on the folder and click Search..
Enter .svn as the filename to search for.
Click “More advanced options” and select:
– Search hidden files and folders
– Search subfolders
Press search button and delete the folders you find appropriate.

The Windows tips came from Axel’s blog at http://www.axelscript.com/2008/03/11/delete-all-svn-files-in-windows/

We’ve been having some issues with people committing to the subversion server without entering a comment. Its easy to to require a comment using a “pre-commit” hook, which is a script that runs before someone’s changes are committed to the repository. A sample commit hook is supplied with subversion that you can enable to require comments. The problem is it doesn’t report back any error message (users will just get a generic “commit failed” in their svn client), and there is no provision for making sure the comment is a minimum length.

I tried to modify the example script, but I’m pretty bad with shell scripting. I looked for a perl one, which I knew I could easily modify, but couldn’t find any. So I whipped this one up:
Continue reading ‘Require subversion comments – a perl pre-commit hook’ »